Beer Photography – Lighting Setup and Technique
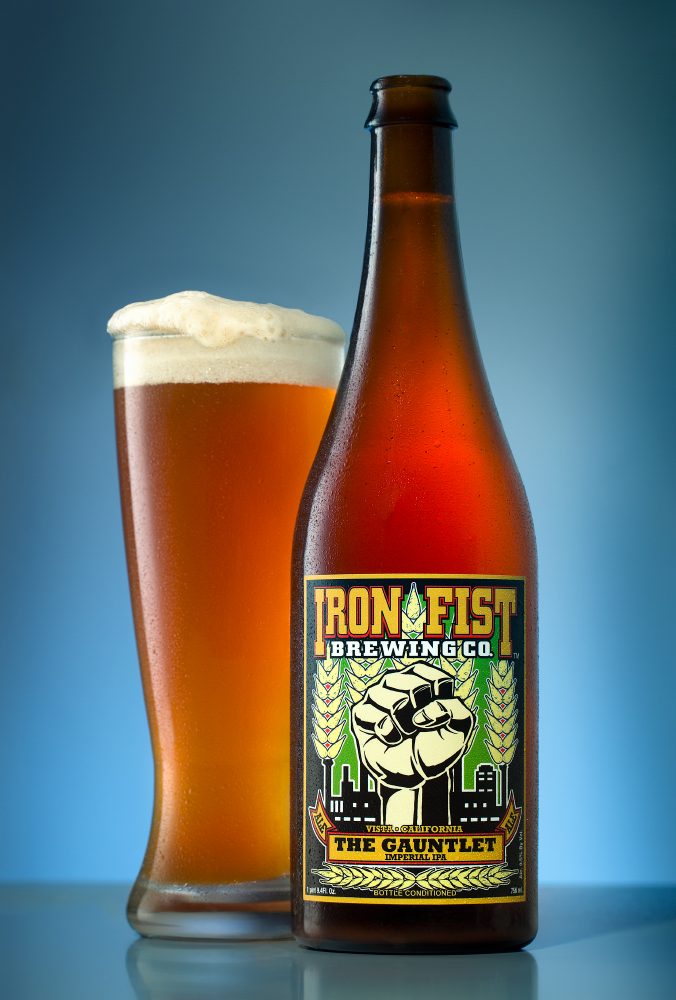
Product photography, and especially beverage photography involving glass, is a true melding of technical geekery and artistic decision making. Although the challenges of photographing glassware and liquid can be at times frustrating, the rewards are high. It’s the feeling of building an image, as if building a piece of furniture. You look at examples, lay out a design, start to assemble the parts, and then you invariably will stray from that design in actual practice which produces something unique. I used to hate tinkering for several hours on one shot, but now I can truly say I enjoy it. Using some tips from my friends at Photigy, as well as their Facebook support group, I set out to make this photo of Iron Fist Brewing Co.’s “The Gauntlet” IPA.
BTS of Lighting Setup

Surface and Staging
The shooting surface was an orphaned part from Ikea. A gray surface was the closest thing I had to metal to represent “Iron”, but the gray looked a little flat to me so I ended up shifting the color toward blue in post production.
The camera was secured on a tripod so that I could keep everything static for comping together multiple shots in the end, if needed. I used a 5d Mark III, with a Lee circular polarizing filter, and 100mm f/2.8L macro lens.
Lighting
Key Light
There were four lights being used. The main light was for lighting the labels and front of the bottle. It was fitted with a small reflector, as well as a layer of diffusion material, followed by a polarizing gel. The camera was also fitted with a circular polarizing filter. This way we can set the camera’s polarizer for the scene and rotate the polarizer on the light until the reflection of our main light disappears. It didn’t disappear completely, so there were still some faint reflections to clone out in the end. However, they were much smaller and darker than they would have been without the polarizing gel.
Side Highlight
The second light provided a nice side highlight on the bottle. It was fitted with strip box at camera left, shot through a diffusion screen of Rosco #3026 diffusion material. Angling the softbox so that it just touches the diffuser will create a highlight on the glass that has a defined edge on one side and tapers off more smoothly on the other. The trick is spacing the glass and bottle just right so that the highlight is not interrupted. If there are small inconsistencies in the highlight they can be addressed in post.
Background Light
The third light was aimed at the background, and has a blue gel taped to it to make the white background paper appear light blue.
Liquid Light
The fourth light is a speed light (Lumopro LP180) laid on the table behind the bottle and glass. This creates the glow through the glass so that you can see the liquid. This one was re-positioned many, many times by hand until the desired result was reached.
Post Production/Retouching
The trickiest element in this shot was the foam. When first opened, the beer was alive with carbonation, but once it settled is was hard to revive. I deployed the Rob Grimm Chopstick Jedi Move, but I really only got one good resurgence of foam, and clicked as many captures during it’s rise and fall as possible. I used one of those captures to composite in the foam (head) from a separate shot.
I also comped in an image where the table looked glossy, but did not have the shadows from the backlight, in order to keep the shadows looking natural.
Lastly, I retouched the small highlights off the bottom and off the bottle to make things look cleaner, added some vignetting and color adjustments to the backdrop and foam, and did some global contrast and sharpness adjustments.
Next time, I’ll definitely have more bottles of the beer on hand and a pump to get it in an out of the glass without moving the set around.
I spent a few hours shooting and editing for one final image, but now that I have a workable setup and routine, I can prepare and execute much, much faster on future beer shoots. If you’re interested in learning beer photography, the key is practice, practice, practice! I always suggest practicing when you have free time and you’re not working on the clock. This way you have complete creative freedom and time to experiment with your lights without the pressure of a deadline.
If your company can use some beautiful and carefully crafter beverage photography, please check out my food and beverage work and REACH OUT.
I share the lighting setups and behind‑the‑scenes from shoots like this on Instagram.
Follow @robandrewphoto
[…] photographer, Rob Andrew. When I first saw Rob Andrew’s blog post with lighting and techniques here, I had to give it a try. Rob Andrew is an amazing photographer in California with a droolworthy […]
What material do you use for the backdrop, is it a paper material? It doesnt appear to be muslin
Yep, just your standard roll of white Savage seamless paper.