Camera Settings for Product Photography
If you’re new to product photography work, its a whole different game than portrait and lifestyle, with its own set of camera settings, lighting techniques, tools and methodology. Lets dive in and look at some of the fundamentals!
Camera Settings
PREFACE: Before getting to camera settings it is MUY IMPORTANTE to tell you that you should always shoot products from a tripod or camera stand. This way you can use whatever shutter speed you want and not worry about shake/blur. Other benefits: 1) You can use your newly liberated hands to style and arrange the product for the photo in a pleasing way. 2.) You can shoot multiple shots and composite them together in Photoshop if needed because the camera didn’t move. 3.) You can use focus stacking software to combine the same shot at different focal points if needed. 4.) You will have your hands free to tinker with lighting.
ISO
The answer to ISO is always “as low as possible”. Raising ISO causes grain which equates to lower quality images with strange colors. Modern cameras do well at higher and higher ISO’s every year it seems, but the answer is still “as low as possible,” which for most cameras is 100.
Aperture
In most product work, more depth of field is desirable. The closer we get to small items the more we struggle to get enough things in focus. This means using something in the f11-f/22 range. It is important to note that lenses don’t always perform so great at their extreme limits so don’t push to f/22 and beyond unless you really need to. I tend to focus on a mid point of the product and f/11-f/16 is almost always enough. If no amount of stopping down gets you enough depth, then you may need to shoot multiple shots from a tripod at different focal distances and stack them later in focus stacking software. (I like Helicon Focus) for this.
Yes, there are times when you want shallower depth of field for creative reasons, but its not the norm in product photography and especially for e-commerce or informational product catalog work, we want f/11 or smaller (higher number).
Shutter Speed
There are some caveats here. In a professional product photography studio like ours, we’re almost always lighting with powerful flashes (aka “strobes”) and we only need to use the camera’s native maximum sync speed, usually 1/125-1/200 (Google your camera’s max sync speed or you can consult the ****GASP**COUGH** manual). Here is how shutter speed comes into play depending on your own lighting situation.
Situation 1 (worst case scenario)- you don’t have a tripod and have to hand hold the camera.
In this case you are more susceptible to camera shake blur because the camera is unstable and you need to use a shutter speed fast enough to hand hold. To figure this out take the inverse of your focal length – I.E. for a 50mm lens, you want 1/50 or faster. If your camera is not full frame you may need to multiply by 1.6 first.
Situation 2- you have a tripod and are using continuous lighting or natural light.
In this case, you are stabilized by the tripod and can use whatever shutter speed your heart desires so long as your subject is not moving.
Situation 3- you have a tripod and are using strobes.
In this case, you are stabilized by the tripod and have the benefit of strobes freezing any motion. Use whatever shutter speed you want but unless you need the ambient or natural lighting in addition to your strobe lighting then just use your cameras max sync speed.
Situation 4- you don’t have a tripod and are using strobes.
In this situation, my suggestion is get on a tripod to make your life easier, but if you must shoot handheld, the strobes will generally help stop any motion or shake unless there’s a lot of natural light adding to your shot, so a shutter speed faster than 1/30th or so, should be reliably ok.
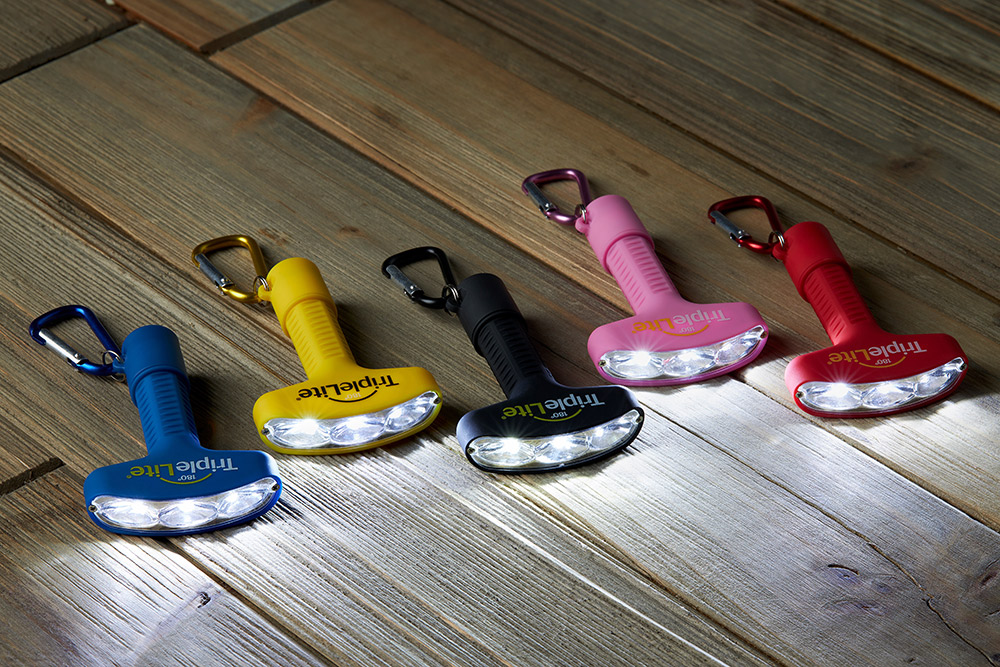
The shot below is a mixture of ambient lighting from the flash light products and strobe lighting from my studio to allow for nice looking lighting while also capturing the natural glow of the flashlights. For this we need a tripod and a slow shutter speed. This is a more complex task.
TLDR
For general product work in reasonably strong light, good settings would be: Shutter speed: 1/125, ISO: 100, Aperture F/16.
Product Photography Best Practices:
- Use a tripod or camera stand.
- Tether your camera to a computer or bigger monitor so you can see fine details on the fly.
- Set your white balance carefully (use a gray card or custom setting, or at least a preset but not AUTO).
- Use manual focus so your focus isn’t changing as you work.
Should you Just Hire a Professional Product Photographer?
If you’re launching a product that you plan to sell commercially and build a brand around, then absolutely yes. Don’t DIY it. A product photographer like myself will not just have technical skills and nice gear, we also have years of retouching, staging, styling, propping and creative experience to give you shots you can continue to use for years to come. Chatting with me and getting pricing is absolutley free. Don’t hesitate to REACH OUT NOW.
This Post Has 0 Comments